
基础定位功能开发
前天把环境搭好了,然后我们来开发一下最最基础的功能,即:传入参数之后可以定位到定义的位置
# 参数设计
最简单的关于定位的参数大概有这些:
domEl: 需要知道要定位的是那个dom元素parentEl: 保存domEl的父元素x: 相对于父元素的x坐标y: 相对于父元素的y坐标width: 元素的宽度height: 元素的高度config: 用于保存原始传进来的config的值
所以先创建一个Accelerator类,使用Accelerator的静态属性来保存默认的属性:
class Accelerator {
  constructor(domEl,config = {}){
    if(!domEl){
        throw Error('Accelerator 必须绑定一个dom元素')
    }
    if(!domEl.parentNode){
        throw Error('Accelerator 绑定元素必须有父元素')
    }
    this.config = {...{
        x:Accelerator.x,
        y:Accelerator.y,
        width:Accelerator.width,
        height:Accelerator.height,
    },...config} //保存原始的config留个底,

    this.domEl = domEl
    this.parentEl = domEl.parentNode
    this.parentElWidth = this.parentEl.clientWidth
    this.parentElHeight = this.parentEl.clientHeight

    this.id = null
    this.x = null  //x坐标
    this.y = null  //y坐标
    this.width = null //宽度
    this.height = null //高度

    this._init()
  },

  _init(){
       this._computedConfig()

        //domEl的父元素必须是relateive定位
        this.parentEl.style.position = 'relative'

        //domEl的父元素必须不能有滚动条
        this.parentEl.style.overflow = 'hidden'
    }
    _computedConfig(){
        this.x = this.config.x
        this.y = this.config.y
        this.width = this.config.width
        this.height = this.config.height
    }
}

Accelerator.x = 0;
Accelerator.y = 0;
Accelerator.width = '100px'
Accelerator.height = '100px'
2
3
4
5
6
7
8
9
10
11
12
13
14
15
16
17
18
19
20
21
22
23
24
25
26
27
28
29
30
31
32
33
34
35
36
37
38
39
40
41
42
43
44
45
46
47
48
49
50
这样实例化:
const domEl = document.createElement('div')
const AC = new Accelerator(domEl,{
  x:'10px',
  y:'10px',
  width:'10%',
  height:'10%'
})
2
3
4
5
6
7
# 单位转换
传参数的时候,为了增加灵活性,我决定支持px和%两种单位,因为日后打算支持拖拽和缩放,所以直接使用%单位计算位置就会很麻烦,所以要先将所有参数都转换成px数值。
- 第一步是将类似'10%'这种字符串分割成'10'和'%'两个部分
/**
 *
 * @param {*String} str 要提取数据的字符串比如 ‘10px’,'20%' ,目前只支持这两种单位
 * @returns
 */
export function getNumAndUnit(str) {
    let reg = /([0-9]+\.*[0-9]*)\s*([a-zA-z%]*)/ig
    let res = reg.exec(str)
    if(res) {
        return {
            num: parseFloat(res[1]) || 0,
            unit: (res[2]!=='px' && res[2]!=='%') ? 'px' : res[2]
        }
    }else{
        return {
            num: 0,
            unit: 'px'
        }
    }
}
2
3
4
5
6
7
8
9
10
11
12
13
14
15
16
17
18
19
20
- 第二步是将数据归一化为代表的像素大小
/**
 *
 * @param {*} str 需要转换的 数值字符串 '10%','20%'
 * @param {*} refer 百分比时参考的100%长度
 * @returns  返回转换成px的数值,以及初始的单位
 */
export function unify(str = '', refer = getWindowSize().width) {
    if(!str) {
        return {
            num: 0,
            originUnit: 'px'
        }
    }
    let numObj = getNumAndUnit(str)
    if(numObj.unit === 'px') {
        return {
            num: numObj.num,
            originUnit: numObj.unit
        }
    }else if(numObj.unit === '%'){
        return {
            num: numObj.num * parseFloat(refer) / 100,
            originUnit: numObj.unit
        }
    }
}
2
3
4
5
6
7
8
9
10
11
12
13
14
15
16
17
18
19
20
21
22
23
24
25
26
然后应用到Acceleretor类上应该是这样:
//.....
_computedConfig(config) {
    this.x = unify(config.x, this.parentElWidth)  //x坐标
    this.y = unify(config.y, this.parentElHeight)  //y坐标
    this.width = unify(config.width, this.parentElWidth) //宽度
    this.height = unify(config.height, this.parentElHeight) //高度
}

//....
2
3
4
5
6
7
8
9
例:
const domEl = document.createElement('div')
const AC = new Accelerator(domEl,{
  x:'10px',
  y:'20px',
  width:'30%',
  height:'40%'
})

console.log(AC.x) // {num:10, originUnit:'px'}
console.log(AC.y) // {num:20, originUnit:'px'}
console.log(AC.width) // {num:30, originUnit:'%'}
console.log(AC.height) // {num:40, originUnit:'%'}
2
3
4
5
6
7
8
9
10
11
12
这里的num都是当前基于父元素的像素值
为什么要保留originUnit呢?
因为以后有拉伸和位移的,如果初始传入的值是%为单位的,则是需要进行响应式计算的,计算完之后需要用原始的单位更新this.config的值。
# 设置样式
初始化完属性值之后,就可以把属性值赋给domEl:
/**
  * 设置元素样式
  */
_setStyle() {
    this.domEl.style.position = 'absolute' //将this.domEl设置为absolute绝对定位
    this.domEl.style.left = this.x.num + 'px'
    this.domEl.style.top = this.y.num + 'px'
    this.domEl.style.width = this.width.num + 'px'
    this.domEl.style.height = this.height.num + 'px'
}
2
3
4
5
6
7
8
9
10
# 监听父元素尺寸
domEl的父元素尺寸如果发生改变的话,参数如果是使用%为单位,则需要重新计算定位,原本我打算监听window的resize事件,但是这并不严谨,因而我采用了轮询去监听父元素尺寸的方式:
class Accelerator {
  constructor(domEl,confog = {}) {
    //...
    this.domEl = domEl
    this.parentEl = domEl.parentNode
    this.parentElWidth = this.parentEl.clientWidth
    this.parentElHeight = this.parentEl.clientHeight
    //....
    this.watchParentInterval = null
  }
  _init(){
    //...
    //监听父元素的尺寸
    this.watchParentInterval = setInterval(this.resize.bind(this),300)
  }
  /**
    * 刷新大小和位置
    */
  resize(){
      let width = this.parentEl.clientWidth
      let height = this.parentEl.clientHeight
      if(width!=this.parentElWidth || height!=this.parentElHeight) {
          this.parentElWidth = this.parentEl.clientWidth
          this.parentElHeight = this.parentEl.clientHeight
          this._computedConfig(this.config)
          //先设置元素样式
          this._setStyle()
      }
  }
}
2
3
4
5
6
7
8
9
10
11
12
13
14
15
16
17
18
19
20
21
22
23
24
25
26
27
28
29
30
# 销毁
有了实例化当然需要有注销实例的方法,注销方法主要是将前面this.watchParentInterval注销掉:
destroy() {
    clearInterval(this.watchParentInterval)
    this.watchParentInterval = null
}
2
3
4
# 销毁所有实例
一个页面里可能实例化了很多个Accelerator,注销的时候一个个注销有点累,所以在Accelerator上添加一个静态方法来注销所有的实例
- 需要给每个实例添加一个不重复的
id属性,这个id我就用自增的int类型数字就好了 - 需要知道一共有哪些实例
所以代码做一下改动:
首先,Accelerator新增静态属性和方法:
//用来保存所有的实例
Accelerator._instanceList = []
//自增的int类型ID
Accelerator.ID = 1

Accelerator.destroyAll = function() {
    for(let i = 0;i < Accelerator._instanceList.length; i++){
        const instance = Accelerator._instanceList[i]
        instance.destroy()
        i--
    }
}
2
3
4
5
6
7
8
9
10
11
12
然后Accelerator类做一下小改动
//src/accelerator/index.js
class Accelerator {
    constructor(domEl,config = {}){
        //...
        this.config = {...{
            id:Accelerator.ID,
            x:Accelerator.x,
            y:Accelerator.y,
            width:Accelerator.width,
            height:Accelerator.height,
            autoCount:Accelerator.autoCount
        },...config} //保存原始的config留个底,

        this.config.id = Accelerator.ID //这个id不允许用户来改变
        //...
        this._init()
    }
    /**
     * 初始化元素的大小和位置,并且刷新Accelerator上的静态参数
     */
    _init(){
        //...
        Accelerator.ID++
        Accelerator._instanceList.push(this)
        //...
    }
    //...
    destroy() {
        clearInterval(this.watchParentInterval)
        this.watchParentInterval = null
        const index = Accelerator._instanceList.findIndex((instance) => { return this.id === instance.id })
        Accelerator._instanceList.splice(index,1)
    }
}
2
3
4
5
6
7
8
9
10
11
12
13
14
15
16
17
18
19
20
21
22
23
24
25
26
27
28
29
30
31
32
33
34
# 封装vue2指令
然后简单的封装一下vue2指令吧~
//src/directive/index.js
import Accelerator from "../accelerator"

const directive = {
    // 当被绑定的元素插入到 DOM 中时……
    inserted: function (el,binding) {
       el.ackun = new Accelerator(el,binding.value)
    },
    update: function(el,binding) {
        el.ackun.destroy()
        el.ackun = new Accelerator(el,binding.value)
    },
    unbind: function(el) {
        el.ackun.destroy()
    }
}

const vueAccelerator = {
    install:function(Vue){
        Vue.directive('accelerator',directive)
    }
}

export default vueAccelerator
2
3
4
5
6
7
8
9
10
11
12
13
14
15
16
17
18
19
20
21
22
23
24
将代码发布到npm上之后在vue项目中安装依赖:
npm install acceleratorkunn -S
然后在vue中注册一下指令:
import {vueAccelerator} from 'acceleratorkunn'

Vue.use(vueAccelerator)
2
3
就可以作为一条指令使用了:
<template>
  <div class="parent">
    <div v-accelerator="config"></div>
  </div>
</template>

<script>
export default {
  data() {
    return {
      config: {
        x:'10%',
        y:'10%',
        width:'20%',
        height:'20%'
      }
    }
  }
}
<script>
2
3
4
5
6
7
8
9
10
11
12
13
14
15
16
17
18
19
20
# 添加智能计算下一个位置功能
来写个有意思点的小功能吧,当实例化一个Accelerator类后,我们希望能够根据上一个实例的参数推断出下一个实例的位置大概在哪里:
- 宽度和高度继承上一个实例的宽高
- 水平方向平铺过去,如果水平方向放不下了就换行
Accelerator类的静态属性加参数:
Accelerator.autoCount = false //是否开启智能计算位置功能
所以在Accelerator类的属性上也加个参数:
class Accelerator {
    constructor(domEl,config = {}){
        //...
        this.config = {...{
            id:Accelerator.ID,
            x:Accelerator.x,
            y:Accelerator.y,
            width:Accelerator.width,
            height:Accelerator.height,
            autoCount:Accelerator.autoCount
        },...config} //保存原始的config留个底,

        //...
        this.autoCount = false //是否自动计算下一个位置的值

        this.watchParentInterval = null
        this._init()
    }
    /**
     * 初始化元素的大小和位置,并且刷新Accelerator上的静态参数
     */
    _init(){
        //...

        //更新Accelerator的静态参数
        if(this.autoCount) {
            this._updateStaticConfig()
        }

       //...
    }
    /**
     *
     * @param {*} config 换算一下属性
     */
    _computedConfig(config) {
        //...
        this.autoCount = config.autoCount //是否自动计算下一个将要添加的元素的位置
    }
    /**
     * 更新Accelerator的静态参数
     */
    _updateStaticConfig(){
        //这里方便定位会自动计算下一个元素的位置
        let newX = this.x.num + this.width.num
        let newY = this.y.num
        if((newX + this.width.num) > this.parentElWidth) {
            newX = 0
            newY = this.y.num + this.height.num
        }
        //这里的初始值会根据之前传入的初始值的单位来计算
        Accelerator.x = getSizeText({num:newX,originUnit:this.x.originUnit},this.parentElWidth)
        Accelerator.y = getSizeText({num:newY,originUnit:this.y.originUnit},this.parentElHeight)
        Accelerator.width = getSizeText(this.width,this.parentElWidth)
        Accelerator.height = getSizeText(this.height,this.parentElHeight)
    }
    //...
}
2
3
4
5
6
7
8
9
10
11
12
13
14
15
16
17
18
19
20
21
22
23
24
25
26
27
28
29
30
31
32
33
34
35
36
37
38
39
40
41
42
43
44
45
46
47
48
49
50
51
52
53
54
55
56
57
58
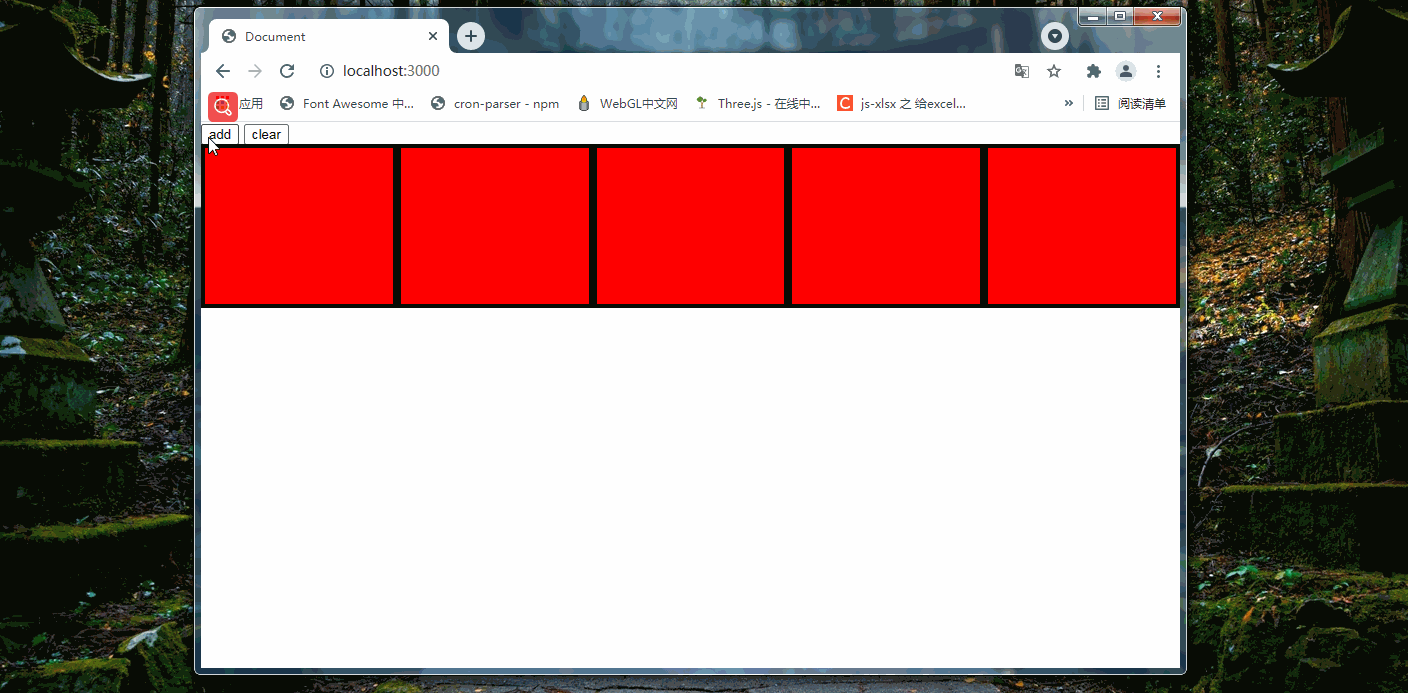
写一个小小的例子来验证一下,就不贴代码了。。直接看下效果吧:
add按钮是添加方块以及实例化Accelerator类,
clear按钮是注销所有的Accelerator实例
可以看到点击clear按钮后响应尺寸变化就没有了,但是dom元素本身还是存在的
# 小小的优化
如果实例化的时候没有传递x,y,width和height参数,先前是直接取了保存在静态属性里的参数,但实际上应该优先取domEl上的宽高和top,height:
export function getElWidth(domEl) {
    return domEl.offsetWidth
}

export function getElHeight(domEl) {
    return domEl.offsetHeight
}

export function getElX(domEl) {
    const cssStyle = getComputedStyle(domEl)
    let isAbsolute = cssStyle.position === 'absolute'
    if(isAbsolute) {
        let left = cssStyle.left
        return left
    }else{
        return ''
    }
}

export function getElY(domEl) {
    const cssStyle = getComputedStyle(domEl)
    let isAbsolute = cssStyle.position === 'absolute'
    if(isAbsolute) {
        let top = cssStyle.top
        return top
    }else{
        return ''
    }
}
2
3
4
5
6
7
8
9
10
11
12
13
14
15
16
17
18
19
20
21
22
23
24
25
26
27
28
29